ASR from Scratch I: Training models of Hong Kong Cantonese using the Kaldi recipe
It is surprising that mainstream forced aligner tools such as MFA, WebMAUS, CLARIN, FAVE, P2FA, and Charsiu have not yet had any pre-trained models of Cantonese (Yue Chinese), native to approximately 82.4 million speakers (Wikipedia), at the time of this blog (2 Oct 2023). Hence, in this chapter I demonstrate how to train acoustic models of Hong Kong Cantonese from scratch using a classic HMM-GMM model through Kaldi, a state-of-the-art ASR toolkit.
This tutorial is built on Eleanor Chodroff’s awesome tutorial on Kaldi and the Kaldi official guide, with enriched implementation details. A dozen of Python snippets were created to prepare the datasets and acquire the forced alignment outputs in the TextGrid format. For more details on the explanations of certain steps, please refer to their tutorials.
All the Python scripts will be available on my Github HKCantonese_models. This tutorial is very long. Feel free to navigate through the section menu on the right on a computer screen.
The Montreal Forced Aligner (MFA) is built upon Kaldi ASR and provides much more straightforward commands for model training and forced alignment. This Kaldi tutorial manifests the inner workings of MFA. For the theory of statistical speech recognition and the MFA approach, check out my slides.
Table of Contents
- 3.1 Kaldi Installation
- 3.2 Setting up Kaldi directories
- 3.3 The Common Voice Dataset
- 3.4 Data preprocessing
- 3.5 Extracting MFCC features
- 3.6 Training and alignment
- 3.7 Forced Alignment
3.1 Kaldi Installation
The Kaldi download and installation is documented in the official Kaldi website. Eleanor’s tutorial also provided the steps in detail. Here is a recap of the general downloading and installation instructions.
If you are a MacOS user with M1 chip, feel free to jump to Section 3.1.1 for more details.
❶ Prerequisites
Kaldi is now hosted on Github for development and distribution. You will need to install Git , the version control system, on your machine.
Software Carpentry has a nice tutorial on Git for beginners, which includes installation of Git across various operating systems.
❷ Downloading
Navigate to the working directory where you would like to install Kaldi (in my case: ~/Work/), and download the Kaldi toolkit via git clone.
cd ~/Work
git clone https://github.com/kaldi-asr/kaldi.git kaldi --origin upstream
❸ Installation
Follow the instructions in the file INSTALL in the downloaded directory kaldi/ to complete the build of the toolkit. It should involve the following steps:
cd kaldi/tools
extras/check_dependencies.sh
make

cd ../src
./configure
make depend
make
3.1.1 Installing Kaldi on a Mac with M1 chip or above
I have encountered many challenges in installing Kaldi on my Mac (Ventura 13.1) with an M1 chip (updated 27 Sept, 2023) and spent a long time debugging. Here I would like to share some tips for those who have similar laptops and builds to assist you in this installation process 🫶. The steps below were tested on macOS Ventura (13.1), but may also work for other recent versions with Apple silicon as well.
3.1.1.1 Prerequisites
❶ You will need Xcode’s Command Line Tools. Install Xcode:
xcode-select --install
You will be prompted to start the installation, and to accept a software license. Then the tools will download and install automatically.
❷* Homebrew, one of the best free and open-source software package management systems for MacOS (and Linux), is recommended. You can install it using the following code.
/bin/bash -c "$(curl -fsSL https://raw.githubusercontent.com/Homebrew/install/HEAD/install.sh)"
❸* Anaconda or miniconda is recommended for creating environments which allows for isolating project-specific dependencies. Follow the link to download the installer.
3.1.1.2 Switching Terminal Architecture
Set up a development environment can be a frustrating process given the updates of different packages and their compatibility. Some applications and tools, for instance, have not yet offer full native support for Apple’s M1/M2 architecture.
To install Kaldi, we should use the x86_64 architecture (up to this date) instead of the Apple native arm64 architecture.
There is a
blog post by Chris Gradwohl that introduces Rosetta Terminal
, the x86_64 emulator. With the translation layer
Rosetta2 by Apple, we can download and compile applications that were built for x86_64 and run them on Apple silicon. Unfortunately the instructions in the blog post are no longer working for MacOS Ventura where the option to easily duplicate the Terminal.App is disabled.
But there is a quick way to switch your terminal default architectures to enable maintaining separate libraries and environments for the arm64 and x86_64 architectures.
Locate the .zshrc file and append the following lines to the end.
alias arm="env /usr/bin/arch -arm64 /bin/zsh --login"

alias intel="env /usr/bin/arch -x86_64 /bin/zsh --login"
Source: https://developer.apple.com/forums/thread/718666
The Zsh shell configuration file, .zshrc, is usually located in your home directory ~/.zshrc and you can use vim to edit it in the terminal. Alternatively, you can reveal the hidden files by pressing ⌘ + shift + . and edit the .zshrc file in your preferred editor.
In fact, the .zshrc file does not exist by default. If you don’t have this file, you can create one by nano ~/.zshrc, add in these two lines, and hit control + X, then Y after the prompt, and return to save the changes.
These commands create aliases arm and intel for the architectures arm64 and x86_64 respectively. For Kaldi installation, we need the x86_64 architecture, so we only need to type intel in the terminal to invoke it.
intel
arch
To confirm the switch, you can type arch. If the output is i386, then it is successful.
3.1.1.3 Creating a Specified Python Environment
Before compiling Kaldi, you can utilise Homebrew (aka brew) to install the necessary additional packages.
brew install automake autoconf wget sox gfortran libtool subversion
Python2.7 is also needed somehow, although very much sunsetted. You can create a separate Python2 environment. The following code creates a Python 2.7 environment named ‘kaldi’ and activates it.
conda create -n kaldi python=2.7
conda activate kaldi
3.1.1.4 Downloading Kaldi
Navigate to the working directory where you would like to install Kaldi (in my case: ~/Work/), and download the Kaldi toolkit via git clone.
cd ~/Work
git clone https://github.com/kaldi-asr/kaldi.git kaldi --origin upstream
3.1.1.5 Installing Tools
Navigate to the kaldi/tools/ directory and check if all required dependencies are installed.
cd kaldi/tools
extras/check_dependencies.sh
✓ OpenBLAS
It is likely that you receive an error message as follows:
OpenBLAS not detected. Run extras/install_openblas.sh
 ... to compile it for your platform, or configure with --openblas-root= if you
 ... have it installed in a location we could not guess. Note that packaged
 ... library may be significantly slower and/or older than the one the above
 ... would build.
 ... You can also use other matrix algebra libraries. For information, see:
 ...   http://kaldi-asr.org/doc/matrixwrap.html
As suggested, we can install OpenBLAS:
extras/install_openblas.sh
You may also find the following error message in the Terminal output:
mv: rename xianyi-OpenBLAS-* to OpenBLAS: No such file or directory
This is due to the fact that
OpenBLAS has updated and the downloaded and unzipped directory has a different name. We can modify the script of install_openblas.sh to make it work.
So in the extras/ directory, we can find the script install_openblas.sh and open it in an editor.
We can add the following two lines below the shebang line #!/usr/bin/env bash.
OPENBLAS_VERSION=0.3.20
MACOSX_DEPLOYMENT_TARGET=11.0
Here you can change the MACOSX_DEPLOYMENT_TARGET to match your MacOS system. 11.0 worked for my laptop.
Then we locate and replace the error line mv xianyi-OpenBLAS-* to OpenBLAS in the script with:
mv OpenMathLib-OpenBLAS-0b678b1 OpenBLAS
In the terminal, re-run the modified script:
extras/install_openblas.sh
In this way, OpenBLAS should be installed successfully.
✓ Intel Math Kernel Libraries (MKL)
Having re-run extras/check_dependencies.sh, it is likely that you receive another error message as follows:
extras/check_dependencies.sh: Intel MKL does not seem to be installed.
 ... Download the installer package for your system from:
 ...   https://software.intel.com/mkl/choose-download
 ... You can also use other matrix algebra libraries. For information, see:
 ...   http://kaldi-asr.org/doc/matrixwrap.html
To install MKL, you can download the MKL standalone offline installer from the
official website and follow the instructions of the installer to complete the installation of MKL libraries. Note down the path where MKL is installed. By default, it should be located somewhere in the /opt/intel/ directory. On my laptop, the path of the mkl.h file is /opt/intel/oneapi/mkl/2023.2.0/include/mkl.h.
Then we edit the check_dependencies.sh script. Locate the lines that point to the path of the file mkl.hand update it accordingly:
    MKL_ROOT="${MKL_ROOT:-/opt/intel/oneapi/mkl}"
       # Check the well-known mkl.h file location.
    if ! [[ -f "${MKL_ROOT}/2023.2.0/include/mkl.h" ]] &&
In this way, the Intel MKL package is installed successfully.
Now we run extras/check_dependencies.sh the third time. You should be able to receive the all OK message.🤗
You can now finally install the tools required by Kaldi using the following code:
make -j 4
The parameter 4 here indicates the number of CPUs. The -j option enables a parallel build to speed up the process. To find out the number of CPU cores on a Mac, you can use the following code:
sysctl -n hw.ncpu
make, make sure to clean up the resulting downloaded directories such as openfst-1.7.2 before running the Makefile again.3.1.1.6 Installing Source
Navigate to the kaldi/src/ directory, run the configuration and the Makefiles as follows:
cd ../src/
./configure --shared
make depend -j 4
make -j 4
In the same way we enable the multi-CPU build by supplying the -j option. Then you can just wait till it finishes.
Hopefully you will see Done in your terminal output and the Kaldi installation is successful.😎
3.2 Setting up Kaldi directories
There is a conventional directory structure for training data and models. We can create a new directory fa-canto/ under the kaldi/egs/ directory to house the relevant files for our project of HK Cantonese. The skeleton for fa-canto/ should be as follows:
.
├── cmd.sh
├── conf
│   └── mfcc.conf
├── data
│   ├── lang
│   ├── local
|   |   └── lang
│   └── train
├── exp
├── mfcc
├── path.sh
├── src -> ../../src
├── steps -> ../wsj/s5/steps
└── utils -> ../wsj/s5/utils
3.2.1 The skeleton structure
To achieve the above structure, you can use the following code in a Unix Shell. For more details, please read
here. Alternatively, for the most part you can also just right click your mouse/pad, select New Folder(Mac), and rename it accordingly.
cd kaldi/egs
mkdir fa-canto

cd fa-canto
ln -s ../wsj/s5/steps .
ln -s ../wsj/s5/utils .
ln -s ../../src .

cp ../wsj/s5/path.sh .
Check and edit the path.sh file in the vim editor. Alternatively, you can open this file in a text editor and modify it from there.
vim path.sh
Press i on your keyboard and change the path line in path.sh to:
export KALDI_ROOT='pwd'/../..
Press esc and then :wq to save and quit.
Then complete the fa-canto/ skeleton:
cd fa-canto
mkdir exp
mkdir conf
mkdir data

cd data
mkdir train
mkdir lang
mkdir local

cd local
mkdir lang
vim is a command-line editor. Typing vim <text file> in a Unix shell opens the file:
- Press
ito insert and edit; Pressescto exit insert mode; - Press
:wqto write and quit;:qto quit normally; - Press
:q!to quit forcibly (without saving).
3.2.2 The mfcc.conf file
In the conf/ directory we create a mfcc.conf file containing the parameters for MFCC extraction. Again we can use vim editor within the Shell:
cd fa-canto/conf
vim mfcc.conf
In the insert mode, add the following lines:
--use-energy=false
--sample-frequency=16000
The sampling frequency should match that of your audio data.
3.2.3 The parallelisation wrapper
Kaldi provides a wrapper to implement data processing and training in parallel, taking advantage of the multiple processors/cores. Kaldi’s wrapper scripts include run.pl, queue.pl, slurm.pl, etc. The applicable script and parameters will be specified in a file called cmd.sh in our directory. For more details about this, please read Eleanor’s
tutorial and the
official guide.
Since I am going to train the data on a personal laptop, I used the run.pl script and set up the cmd.sh as follows:
cd fa-canto
vim cmd.sh
Insert the following lines in cmd.sh:
train_cmd="run.pl"
decode_cmd="run.pl"
run.pl runs all the jobs you request on the local machine, and does so in parallel if you use a job range specifier, e.g. JOB=1:4.
run.pl doesn’t keep track of how many CPUs are available or how much memory your machine has. If you use run.pl to run scripts that were designed to run with queue.pl on a larger grid, you may end up exhausting the memory of your machine or overloading it with jobs (from Kaldi official guide).Lastly, we run the cmd.sh file:
. ./cmd.sh
3.3 The Common Voice Dataset
We will be using the latest Chinese (Hong Kong) subset of the publicly available Common Voice corpus Common Voice Corpus 15.0 updated on 9/14/2023, which contains 108 hours of validated speech with 3001 voices (3.3G .mp3 files).
You can download the dataset here and unzip it to your working directory. The downloaded corpus has the following structure:
├── cv-corpus-15.0-2023-09-08
... └── zh-HK
        ├── clip_durations.tsv
        ├── train.tsv
        ├── validated.tsv
        ├── dev.tsv
        ├── test.tsv
        ├── Invalidated.tsv
        ├── other.tsv
        ├── reported.tsv
        ├── times.txt
        └── clips
            ├── common_voice_zh-HK_20096730.mp3
            ├── common_voice_zh-HK_20096731.mp3
            ├── common_voice_zh-HK_20096732.mp3
            ├── ...
            └── ... #118736 items in total
Most of the audio clips are short utterances or sentences (fewer than 30 syllables) and have their corresponding transcription in these .tsv files. In this tutorial, we will mainly use the training set (see train.tsv) which has 8426 recordings.
3.4 Data preprocessing
3.4.1 Setting up the environment
I created a new Conda environment named ‘acoustics’ for acoustic processing. This step is not compulsory, but highly recommend because you can manage a collection of packages and their dependencies related to this project or pipeline in one place.
conda create -n acoustics
conda activate acoustics
The Python packages I used include: datasets, re, os, sys, pandas, csv, tqdm, subprocess, transformers, lingpy, praatio. You can install these via Conda or other package management systems. We also need
sox, a command-line audio editing software.
I created a working directory for data pre-processing fa-cantonese/ and moved the data folder here: fa-cantonese/cv-corpus-15.0-2023-09-08/.
cd ~/Work
mkdir fa-cantonese
3.4.2 Audio preprocessing: .mp3 to .wav
While the compressed format .mp3 is storage-friendly, we should use .wav for acoustic modeling and training.
Inside the Common Voice directory cv-corpus-15.0-2023-09-08/, I created a new directory clips_wavs/ for converted .wav files.
In my working directory fa-cantonese/, I wrote a python script mp3towav.py to convert the audio format from .mp3 to .wav with 16K sampling rate, using sox. The Python package subprocess enables running the external sox command in parallel.
# mp3towav.py
# Created by Chenzi Xu on 30/09/2023

import re
import os
from tqdm import tqdm
import subprocess
from tqdm.contrib.concurrent import process_map

path = 'cv-corpus-15.0-2023-09-08/zh-HK/clips'
output = 'cv-corpus-15.0-2023-09-08/zh-HK/clips_wavs'

file_pairs = [(file,re.search(r'(.*?)\.mp3',file).group(1)+'.wav') for file in tqdm(os.listdir(path))]

def convert_and_resample(item):
    command = ['sox', os.path.join(path,item[0]),'-r','16000',os.path.join(output,item[1])]
    subprocess.run(command)

if __name__ == '__main__':
    wavs = process_map(convert_and_resample, file_pairs, max_workers=4, chunksize=1)
3.4.3 Transcripts preparation: The text file
The Kaldi recipe will require a text file with the utterance-by-utterance transcript of the corpus, which has the following format (see Elinor’s tutorial
here):
utt_id WORD1 WORD2 WORD3 WORD4 …
# utt_id = utterance ID
We can achieve this in two steps:
❶ Define an utterance ID
In our Common Voice corpus, we have the train.tsv which contains columns such as client_id (I assumed this representing a unique speaker), path (a unique file name), and sentence (the transcript for the audio file). We can define an utterance ID by concatenating the client_id and the unique numbers in path after removing the prefix common_voice_zh-HK_ and the file extension .mp3.
❷ Tokenise Cantonese transcript
The Chinese orthography is very useful in identifying syllables. A good way to tokenise Cantonese transcript is to separate each character with a space, so that we will obtain syllable-level alignment of speech and text. Note that in Hong Kong Cantonese, there is often code-switching and thus you will occasionally see English words in the transcripts.
The following Python snippet cv15_totext.py will help us prepare the text file.
# cv15_totext.py
# Created by Chenzi Xu on 30/09/2023.

from datasets import load_dataset
import re

cv_tsv = load_dataset('csv',
                      data_files="cv-corpus-15.0-2023-09-08/zh-HK/train.tsv",
                      sep="\t")

cv_tsv = cv_tsv['train']
cv_text = cv_tsv.remove_columns(['up_votes', 'down_votes', 'age', 'gender', 'accents', 'variant', 'locale', 'segment'])

def prepare_text(batch):
  """Function to preprocess the dataset with the .map method"""
  transcription = batch["sentence"]
  utt_id = batch['path']
  spk_id = batch['client_id']

  #remove punctuation
  puncs = r'[^\u4e00-\u9FFFa-zA-Z0-9 ]'
  transcription = re.sub(puncs, '', transcription)

  #add space between Chinese characters
  transcription = re.sub(r'([\u4e00-\u9fff])', r'\1 ', transcription).strip()
  #add space after an English word followed by a Chinese character
  transcription = re.sub(r'([a-zA-Z0-9_]+)([\u4e00-\u9fff])', r'\1 \2', transcription)

  batch["sentence"] = transcription
  batch['client_id']= spk_id+ '-'+ utt_id[19:-4]

  return batch

texts = cv_text.map(prepare_text, desc="preprocess text")
texts = texts.remove_columns(['path'])
texts.to_csv('text', sep='\t', header=False,index=False)
The output of the above script looks as follows:
9a3a...43-22235680	兩 個 人 扯 貓 尾 唔 認 數
9a3a...43-22235715	你 知 唔 知 點 去 中 環 安 慶 台 嗰 間 缽 仔 糕
9a3a...43-22235825	車 站 路
9a3a...43-22235895	陳 師 奶 要 去 深 水 埗 欽 州 街 搵 個 朋 友 一 齊 打 麻 雀
...

# utterance ID is not fully shown given the space here
We can then move this text file to our Kaldi training directory at kaldi/egs/fa-canto/data/train.
3.4.4 The dictionary lexicon.txt: Cantonese G2P
We will need a Cantonese pronunciation dictionary lexicon.txt of the words/characters, in fact, only the words, present in the training corpus. This will ensure that we do not train extraneous phones. If we want to use IPA symbols for acoustic models, we should transcribe the words/characters in IPA in this dictionary.
We first find the list of unique words/characters in the training corpus:
cut -f 2 text | sed 's/ /\n/g' | sort -u > words.txt
We can then download an open Cantonese dictionary from open-dict-data or CharsiuG2P and utilise the multilingual CharsiuG2P tool with a pre-trained Cantonese model for grapheme-to-phoneme conversion.
The open dictionary has the following format:
𠻺	/a:˨/
㝞	/a:˥/
㰳	/a:˥/, /a:˧/
...
䧄	/a:k˥/, /kɔ:k˧/
...
Generally, we want ❶ each phone in the dictionary to be separated by a space. ❷ The tone label is always put at the end of an IPA token, which gives an impression of tone being a linearly arranged segment. Tone, however, is suprasegmental. We might want to exclude the tone labels here. ❸ We can have multiple pronunciation entries for a word, which are usually put in different rows. ❹ We need to add the pseudo-word entries such as <oov> and {SL}, required by the Kaldi training recipe. <oov> stands for ‘out of vocabulary’ items including unknown sounds and laughter, {SL} for silence.
Therefore, we need to revise the format of a downloaded dictionary. The following python script canto_g2p.py creates a lexicon.txt file using CharsiuG2P and their open dictionary. Then we manually added the pseudo-word entries.
# canto_g2p.py
# Created by Chenzi Xu on 30/09/2023

from transformers import T5ForConditionalGeneration, AutoTokenizer
from tqdm import tqdm
import pandas as pd
from lingpy import *

# load G2P models
model = T5ForConditionalGeneration.from_pretrained('charsiu/g2p_multilingual_byT5_small_100')
tokenizer = AutoTokenizer.from_pretrained('google/byt5-small')
model.eval()

# load pronunciation dictionary
pron = {l.split('\t')[0]:l.split('\t')[1].strip() for l in open('yue.tsv','r',encoding="utf-8").readlines()}

with open('lexicon.txt','w', encoding='utf-8') as output:

    rows=[]
    with open('words.txt','r',encoding='utf-8') as f:
        for line in tqdm(f):
            w = line.strip()
            word_pron = ''
            if w in pron:
                word_pron+=pron[w]
            else:
                out = tokenizer(['<yue>: '+w],padding=True,add_special_tokens=False,return_tensors='pt')
                preds = model.generate(**out,num_beams=1,max_length=50)
                phones = tokenizer.batch_decode(preds.tolist(),skip_special_tokens=True)
                word_pron+=phones[0]

            rows.append([w,word_pron])

    lexicon = pd.DataFrame(rows, columns=['word', 'ipa'])
    lexicon['ipa'] = lexicon['ipa'].str.split(',')
    lexicon = lexicon.explode('ipa')

    #remove IPA tones and tokenize IPA-encoded strings
    lexicon['ipa'] = lexicon['ipa'].str.replace(r'[\u02E5-\u02E9]+', '', regex=True)
    lexicon['ipa'] = lexicon['ipa'].apply(lambda x: ' '.join(map(str, ipa2tokens(x))))

    #remove duplicated rows if any
    lexicon.drop_duplicates(inplace=True)
    lexicon.to_csv(output,sep='\t', index=False, header=False)
The final dictionary is as follows:
<oov>	oov
{SL}	sil
A	a:
Annual	a: nn ʊ ŋ
Anson	a: n s ɔ: n
B	b i:
Browser	pʰ r ɔ: w s ɐ
...
一	j ɐ t
丁	t s a: ŋ
丁	t ɪ ŋ
丁	t s ɐ ŋ
...
We can then move this lexicon.txt file to our kaldi training directory at kaldi/egs/fa-canto/data/local/lang.
3.4.4 Other text files for Kaldi data/train
To train acoustic models in Kaldi, we also need text files:
segments,wav.scp,utt2spk,spk2utt.
We can generate them in our data working directory fa-cantonese/ and then move them to the kaldi training directory at kaldi/egs/fa-canto/data/train. I included some Python snippets to facilitate creating these files. You can also achieve this in your preferred programming language.
❶ The utt2spk file
The utt2spk file contains the mapping of each utterance to its corresponding speaker, which has the following general form:
utt_id spkr
# utt_id: utterance ID
# spkr: speaker ID
We can use the Python script cv15_utt2spk.py below:
# cv15_utt2spk.py
# Created by Chenzi Xu on 30/09/2023.

import pandas as pd

cv_tsv = pd.read_csv('cv-corpus-15.0-2023-09-08/zh-HK/train.tsv', sep='\t')

df = cv_tsv[['path','client_id']]
# create utt_id
df['path']=df['path'].str.replace('common_voice_zh-HK_','')
df['path']=df['path'].str.replace('.mp3','')
df['utt_id']=df['client_id'] +'-'+df['path']
# save it as a reference table
df.to_csv('table.csv', index=False, header=False)

df = df[['utt_id', 'client_id']]
df.drop_duplicates(inplace=True)
df.to_csv('utt2spk', sep=' ', index=False, header=False)
The output is as follows (the utterance ID is not fully shown):
01b0...2e-22244218 01b0...2e
01b0...2e-22391509 01b0...2e
01b0...2e-22391576 01b0...2e
...
Apart from outputting the utt2spk file, I also made a table.csv containing the pairing information of utt_id, client_id, and path(file_id) for later reference.
❷ The wav.scp file
wav.scp contains the file path for all audio files, which has the following general form:
file_id path/file
In our case, we only have one utterance in one audio file. So the file_id is the same as utt_id.
# cv15_wavscp.py
# Created by Chenzi Xu on 30/09/2023.

import os
import pandas as pd

dir = 'cv-corpus-15.0-2023-09-08/zh-HK/clips_wavs'

table = pd.read_csv('table.csv', names = ['file', 'client_id','utt_id'])

path=[]

for root, dirs, files in os.walk(os.path.abspath(dir)):
    for file in files:
        path.append([file[19:-4], os.path.join(root, file)])

df = pd.DataFrame(path, columns=['file', 'path'])
df['file'] = df['file'].astype('int64')

df_update = pd.merge(df, table, on='file', how='right')
df_update = df_update[['utt_id','path']]
df_update.to_csv('wav.scp', sep=' ', index=False, header=False)
The output is as follows (the utterance ID is not fully shown):
01b0...2e-22244218 /Users/cx936/Work/fa-cantonese/cv-corpus-15.0-2023-09-08/zh-HK/clips_wavs/common_voice_zh-HK_22244218.wav
01b0...2e-22391509 /Users/cx936/Work/fa-cantonese/cv-corpus-15.0-2023-09-08/zh-HK/clips_wavs/common_voice_zh-HK_22391509.wav
01b0...2e-22391576 /Users/cx936/Work/fa-cantonese/cv-corpus-15.0-2023-09-08/zh-HK/clips_wavs/common_voice_zh-HK_22391576.wav
...
❸ The segments file
The segments file contains the start and end time for each utterance in an audio file, with the following general form:
utt_id file_id start_time end_time
Again in our case, the first two fields are the same, the start time is always 0, and the end time is the total duration of an audio file. We can make use of the duration information in clip_durations.tsv available in the Common Voice dataset.
# cv15_segments.py
# Created by Chenzi Xu on 30/09/2023.

import pandas as pd

dur = pd.read_csv('cv-corpus-15.0-2023-09-08/zh-HK/clip_durations.tsv', sep='\t', header=0)

dur['file']=dur['clip'].str.replace('common_voice_zh-HK_','')
dur['file']=dur['file'].str.replace('.mp3','')
dur['file'] = dur['file'].astype('int64')

table = pd.read_csv('table.csv', names = ['file', 'client_id','utt_id'])

df = pd.merge(dur, table, on='file', how='right')
df['file_id'] = df['utt_id']
df['start_time'] = 0.0
df['end_time']= df['duration[ms]']/1000
df = df[['utt_id','file_id','start_time','end_time']]

df.to_csv('segments', sep=' ', index=False, header=False)
The output is as follows (the utterance ID is not fully shown):
01b0...2e-22244218 01b0...2e-22244218 0.0 5.832
01b0...2e-22391509 01b0...2e-22391509 0.0 4.584
01b0...2e-22391576 01b0...2e-22391576 0.0 4.848
...
❹ The spk2utt file
spk2utt is a file that contains the speaker to utterance mapping, with the following general form:
spkr utt_id1 utt_id2 utt_id3
We can use the Kaldi script below to automatically generate this file given the utt2spk file and also check if all required data files are present and in the correct format.
utils/fix_data_dir.sh data/train
The output is as follows (the utterance ID is not fully shown):
01b0...2e 01b0...2e-22244218 01b0...2e-22391509 01b0...2e-22391576 01b0...2e-22391635 01b0...2e-22391636 ...
...
3.4.5 Other text files for Kaldi data/local/lang
Apart from the lexicon.txt file, we should create a few other text files about the language data specific to our training corpus including
nonsilence_phones.txt,optional_silence.txt,silence_phones.txt,extra_questions.txt(optional).
❶ The nonsilence_phones.txt file
This file contains a list of all the typical phones that are not silence.
cut -f 2 lexicon.txt | sed 's/ /\n/g' | sort -u > nonsilence_phones.txt
lexicon.txt, I have used a tab between a Cantonese character and its tokenised (space-separated) IPA string, which is the default delimiter for the cut command. You can specify the delimiter using the flag -d '(delimiter)' if you used a different one.The nonsilence_phones.txt is displayed below:
a:
a:i
a:u
b
d
e
ei
f
h
i:
...
❷ The optional_silence.txt file
This file only has one line, the sil (silence) phone.
echo 'sil' > optional_silence.txt
❸ The silence_phones.txt file
This file will contain the special, non-word phones in your dictionary:
sil
oov
You can use the following code:
echo "sil\noov" > silence_phones.txt
❹ The extra_questions.txt file
We can skip this step for now. A Kaldi script will generate a basic extra_questions.txt file for you, but in data/lang/phones. For more details, read
here.
3.4.6 Creating files for Kaldi data/lang
We then use a script to generate files in data/lang. This shell script takes four arguments: <dict-dir/>, <'oov-word-entry'>, <tmp-dir/>, and <lang-dir/>. In our case, we can use the script as follows:
cd fa-canto
utils/prepare_lang.sh data/local/lang '<oov>' data/local/ data/lang
You will notice new files generated in the data/lang directory: L.fst, L_disambig.fst, oov.int, oov.txt, phones.txt, topo, words.txt, and phones/. It is worth checking out the extra_questions.txt file inside the phones/ directory to see how the model may be learning more about a phone’s contextual information.
If you arrive at this stage, you have completed the data preparation. We can now start training our first model.
3.5 Extracting MFCC features
The first step is to extract the Mel Frequency Cepstral Coefficients (MFCCs) of the speech signals and compute the cepstral mean and variance normalization (CMVN) stats, using shell scripts as follows:
cd fa-canto

mfccdir=mfcc
x=data/train
steps/make_mfcc.sh --cmd "$train_cmd" --nj 4 $x exp/make_mfcc/$x $mfccdir
steps/compute_cmvn_stats.sh $x exp/make_mfcc/$x $mfccdir
The --nj option specifies the number of jobs to be sent out and processed in parallel. Since I was training the dataset on my (not-too-powerful) laptop, I kept this number low here.
3.6 Training and alignment
The training and alignment procedure follows Eleanor’s tutorial, which is briefly recapped here. There are a handful of training scripts based on different algorithms in Kaldi. In our training procedure, we start with a monophone model, which is often the bootstrap model leveraged to train more sophisticated models.
3.6.1 Monophone training and alignment
❶ To train a monophone model, we use the training script train_mono.sh:
cd fa-canto

steps/train_mono.sh --boost-silence 1.25 --nj 4 --cmd "$train_cmd" data/train data/lang exp/mono
This script has three optional arguments, i.e. --boost-silence 1.25, --nj 4, --cmd "$train_cmd", and three base arguments, i.e. data/train (acoustic data), data/lang (lexicon), exp/mono (destination directory). --boost-silence is included as standard protocol and --cmd designates the machine or system that handles the processing. Recall that we set up the $cmd variable and parameters in cmd.sh in §3.2.3.
A training script generally takes the following four arguments in order:
- Location of the acoustic data:
data/train - Location of the lexicon:
data/lang - Source directory for the model:
exp/lastmodel - Destination directory for the model:
exp/currentmodel
The training scripts we will be using in §3.6.2 have the same argument structure as above. You have probably noticed that for the first model there are only three (base) arguments, since the source directory for an earlier model does not yet exist.
❷ To align monophones, we use the align_si.sh script:
steps/align_si.sh --boost-silence 1.25 --nj 4 --cmd "$train_cmd" data/train data/lang exp/mono exp/mono_ali || exit 1;
Similar to a training script, an alignment script takes the following four arguments in order:
- Location of the acoustic data:
data/train - Location of the lexicon:
data/lang - Source directory for the model:
exp/currentmodel - Destination directory for the alignment:
exp/currentmodel_ali
3.6.2 Triphone training and alignment
To train a triphone model, we need to include additional arguments for the algorithm: ❶ the number of leaves, or HMM states, on the decision tree and ❷ the number of Gaussians. In the following command, we specify 2000 HMM states and 10000 Gaussians, based on heuristics.
The numbers will largely depend on the amount of data, number of phonetic questions, and goal of the model. There is also the constraint that the number of Gaussians should always exceed the number of leaves (from Eleanor Chodroff’s tutorial).
steps/train_deltas.sh --boost-silence 1.25 --cmd "$train_cmd" 2000 10000 data/train data/lang exp/mono_ali exp/tri1 || exit 1;
Align delta-based triphones
steps/align_si.sh --nj 4 --cmd "$train_cmd" data/train data/lang exp/tri1 exp/tri1_ali || exit 1;
As you can see below, we are gradually increase the numbers of leaves and Gaussians as we refine our model with further training algorithms.
Train delta + delta-delta triphones
steps/train_deltas.sh --cmd "$train_cmd" 2500 15000 data/train data/lang exp/tri1_ali exp/tri2a || exit 1;
Align delta + delta-delta triphones
steps/align_si.sh --nj 4 --cmd "$train_cmd" --use-graphs true data/train data/lang exp/tri2a exp/tri2a_ali || exit 1;
Train LDA-MLLT triphones
steps/train_lda_mllt.sh --cmd "$train_cmd" 3500 20000 data/train data/lang exp/tri2a_ali exp/tri3a || exit 1;
Align LDA-MLLT triphones with FMLLR
steps/align_fmllr.sh --nj 4 --cmd "$train_cmd" data/train data/lang exp/tri3a exp/tri3a_ali || exit 1;
Train SAT triphones
steps/train_sat.sh --cmd "$train_cmd" 4200 40000 data/train data/lang exp/tri3a_ali exp/tri4a || exit 1;
Align SAT triphones with FMLLR
steps/align_fmllr.sh --cmd "$train_cmd" data/train data/lang exp/tri4a exp/tri4a_ali || exit 1;
3.7 Forced Alignment
Having run an alignment script, the time alignment for the training data can be directly extracted and converted to Praat TextGrids. By doing so we can check how good the models are and see if the forced alignment is sensible.
3.7.1 Extracting alignment: from CTM output to phone and word alignments
Let us check out the alignment from the SAT triphone model. We can extract the CTM output, that is, the time-marked conversation file containing temporal information of the phone transcription of utterances. Its general form is:
utt_id channel_num start_time phone_dur phone_id
We can use the following script to extract the .ctm files and concatenate them into a large text file.
cd fa-canto

for i in  exp/tri4a_ali/ali.*.gz;
do src/bin/ali-to-phones --ctm-output exp/tri4a/final.mdl ark:"gunzip -c $i|" -> ${i%.gz}.ctm;
done;

cd fa-canto/exp/tri4a_ali
cat *.ctm > merged_alignment.txt
The CTM output is as follows:
01b0...2e-22244218 1 0.000 0.750 1
01b0...2e-22244218 1 0.750 0.110 72
01b0...2e-22244218 1 0.860 0.070 221
01b0...2e-22244218 1 0.930 0.070 76
01b0...2e-22244218 1 1.000 0.070 197
01b0...2e-22244218 1 1.070 0.160 19
...
In this file, ❶ the third and fourth columns report start and end times relative to an utterance. Given that our data has one utterance per file, these can be considered as file times too. Otherwise we will need the segments file in data/train to convert the utterance times to file times. ❷ The last column represents the phone ID, and we need the phones.txt file in data/lang to translate them into phone symbols.
# id2phone.py
# Created by Chenzi Xu on 30/09/2023.

import pandas as pd

ctm = pd.read_csv('merged_alignment.txt', sep=' ', encoding='utf-8',
                   names=['file_utt','utt','start','dur','id'])
ctm['file'] = ctm['file_utt']
ctm['filename'] = 'common_voice_zh-HK_' + ctm['file_utt'].str.extract(r'-(\d+)$') #only one utterance per file

phones = pd.read_csv('phones.txt', sep=' ', encoding='utf-8',
                   names=['phone','id'])

segments = pd.read_csv('segments', sep=' ', encoding='utf-8',
                   names=["file_utt","file","start_utt","end_utt"])

ctm2 = pd.merge(ctm, phones, on='id', how='left')
ctm3 = pd.merge(ctm2, segments, on=["file_utt","file"], how='left')

ctm3['start_real'] = ctm3['start'] + ctm3['start_utt']
ctm3['end_real'] = ctm3['start_real'] + ctm3['dur']

ctm3= ctm3[['filename', 'phone', 'start_real', 'end_real']]

ctm3.to_csv('final_ali_short.txt', sep='\t', index=False, header=False)
Using above Python script id2phone.py, we can obtain a more readable file with time-aligned phones:
common_voice_zh-HK_22244218	sil	0.0	0.75
common_voice_zh-HK_22244218	j_B	0.75	0.86
common_voice_zh-HK_22244218	ɐu_E	0.86	0.93
common_voice_zh-HK_22244218	k_B	0.93	1.0
common_voice_zh-HK_22244218	ɔ:_E	1.0	1.07
common_voice_zh-HK_22244218	a:_S	1.07	1.23
common_voice_zh-HK_22244218	p_B	1.23	1.3
...
The [B, I, E, S] suffixes indicate the context in which a phone appears. We can make use of this information to ❶ group phones into word/morpheme-level units (using phons2pron.py), and ❷ match the word/morpheme-level units to the corresponding lexical items using the dictionary lexicon.txt (using phons2words.py).
#  phons2pron.py
#  Created by Eleanor Chodroff on 2/07/16.
#  Modified by Chenzi Xu on 1/10/23.

import glob

pron_ali=open("pron_alignment.txt",'w')
pron=[]

files = glob.glob('align_txt/*.txt')

# process each file
for file in files:
    print(file)
    f = open(file, 'r')
    pron_ali.write('\n')
    for line in f:
        line = line.split("\t")
        file=line[6]
        file = file.strip()
        phon_pos=line[7]
        #print phon_pos
        if phon_pos == "sil":
            phon_pos = "sil_S"
        phon_pos=phon_pos.split("_")
        phon=phon_pos[0]
        pos=phon_pos[1]
        #print pos
        if pos == "B":
            start=line[10]
            pron.append(phon)
        if pos == "S":
            start=line[10]
            end=line[11]
            pron.append(phon)
            pron_ali.write(file + '\t' + ' '.join(pron) +'\t'+ str(start) + '\t' + str(end))
            pron=[]
        if pos == "E":
            end=line[11]
            pron.append(phon)
            pron_ali.write(file + '\t' + ' '.join(pron) +'\t'+ str(start) + '\t' + str(end))
            pron=[]
        if pos == "I":
            pron.append(phon)
The time alignment of grouped phones:
common_voice_zh-HK_22267475	sil	0.0	0.82
common_voice_zh-HK_22267475	t ʊ ŋ	0.82	1.10
common_voice_zh-HK_22267475	f ɔ: ŋ	1.1	1.53
common_voice_zh-HK_22267475	sil	1.53	1.6
common_voice_zh-HK_22267475	t a:i	1.6	1.79
common_voice_zh-HK_22267475	h ɔ: k	1.79	1.99
common_voice_zh-HK_22267475	s ɪ ŋ	1.99	2.21
...
#!/usr/bin/python
# -*- coding: utf-8 -*-
#
#  phons2words.py
#  Created by Eleanor Chodroff on 2/07/16.
#  Modified by Chenzi Xu on 30/09/23.

#### issues with unicode (u'')
import sys,csv,os,os.path,re,codecs

# make dictionary of word: prons
lex = {}

with codecs.open("lexicon.txt", "rb", "utf-8") as f:
    for line in f:
        line = line.strip()
        columns = line.split("\t")
        word = columns[0]
        pron = columns[1]
        #print pron
        try:
            lex[pron].append(word)
        except:
            lex[pron] = list()
            lex[pron].append(word)

# open file to write
word_ali = codecs.open("word_alignment.txt", "wb", "utf-8")

# read file with most information in it
with codecs.open("pron_alignment.txt", "rb", "utf-8") as f:
    for line in f:
        line = line.strip()
        line = line.split("\t")
        # get the pronunciation
        pron = line[1]
        # look up the word from the pronunciation in the dictionary
        word = lex.get(pron)
        word = word[0]
        file = line[0]
        start = line[2]
        end = line[3]
        word_ali.write(file + '\t' + word + '\t' + start + '\t' + end + '\n')
The time alignment of lexical items / characters:
common_voice_zh-HK_22267475	{SL}	0.0	0.82
common_voice_zh-HK_22267475	冬	0.82	1.0999999999999999
common_voice_zh-HK_22267475	仿	1.1	1.53
common_voice_zh-HK_22267475	{SL}	1.53	1.6
common_voice_zh-HK_22267475	Time	1.6	1.79
common_voice_zh-HK_22267475	學	1.79	1.99
common_voice_zh-HK_22267475	丞	1.99	2.21
...
3.7.2 Creating Praat TextGrids
We can use a Python script split_alignment.py to separate alignment results by unique files. Take the phone transcript as an example.
#  split_alignment.py
#  Created by Eleanor Chodroff on 3/25/15.
#  Modified by Chenzi Xu on 30/09/23.

import sys,csv
results=[]

#name = name of first text file in final_ali_short.txt
#name_fin = name of final text file in final_ali_short.txt

name = "common_voice_zh-HK_22267475"
name_fin = "common_voice_zh-HK_23688013"

try:
    with open("final_ali_short.txt") as f: #pron_alignment
#        next(f) #skip header
        for line in f:
            columns=line.split("\t")
            name_prev = name
            name = columns[0]
            if (name_prev != name):
                try:
                    with open("align_txt/"+name_prev+".txt",'w') as fwrite: #align_prons
                        writer = csv.writer(fwrite)
                        fwrite.write("\n".join(results))
                        fwrite.close()
                #print name
                except Exception as e:
                    print("Failed to write file",e)
                    sys.exit(2)
                del results[:]
                results.append(line[0:-1])
            else:
                results.append(line[0:-1])
except Exception as e:
    print("Failed to read file",e)
    sys.exit(1)
# this prints out the last textfile (nothing following it to compare with)
try:
    with open("align_txt/"+name_prev+".txt",'w') as fwrite:
        writer = csv.writer(fwrite)
        fwrite.write("\n".join(results))
        fwrite.close()
                #print name
except Exception as e:
    print("Failed to write file", e)
    sys.exit(2)
For example, here is the phone alignment for the audio file common_voice_zh-HK_20099684.wav.
common_voice_zh-HK_20099684	sil	0.0	0.71
common_voice_zh-HK_20099684	tʰ_B	0.71	0.82
common_voice_zh-HK_20099684	a:i_E	0.82	1.03
common_voice_zh-HK_20099684	k_B	1.03	1.13
common_voice_zh-HK_20099684	u:_E	1.13	1.23
common_voice_zh-HK_20099684	s_B	1.23	1.33
common_voice_zh-HK_20099684	ɪ_I	1.33	1.40
common_voice_zh-HK_20099684	ŋ_E	1.4	1.51
common_voice_zh-HK_20099684	t_B	1.51	1.57
common_voice_zh-HK_20099684	ou_E	1.57	1.83
common_voice_zh-HK_20099684	sil	1.83	3.12
If we want to convert the tabular format of time-aligned phones into Praat TextGrid format, we can the following Python script tsv2praat.py.
#  tsv2praat.py
#  Created by Chenzi Xu on 2/10/23.

import os
import re
from praatio import textgrid
from praatio.utilities.constants import Interval
import pandas as pd
from tqdm import tqdm


for file in tqdm(os.listdir('align_txt/')):
    name, ext = os.path.splitext(file)
    if not ext = ".txt":
        continue
    tg_path = 'tg_phons/' + name + '.TextGrid'
    tsv=pd.read_csv('align_txt/'+file, sep='\t', names=['file', 'phone_pos','start','end'])
    dur = tsv.iloc[-1,-1]
    wordTier = textgrid.IntervalTier('phones', [], 0, dur)
    tg = textgrid.Textgrid()
    new = [(round(row[2], 2), round(row[3], 2), re.sub(r'_.*$', '', row[1])) for index, row in tsv.iterrows()]
    wordTier = wordTier.new(entries=new)
    tg.addTier(wordTier)
    tg.save(tg_path, format="short_textgrid", includeBlankSpaces=True)
The TextGrid output for the previous example is as follows: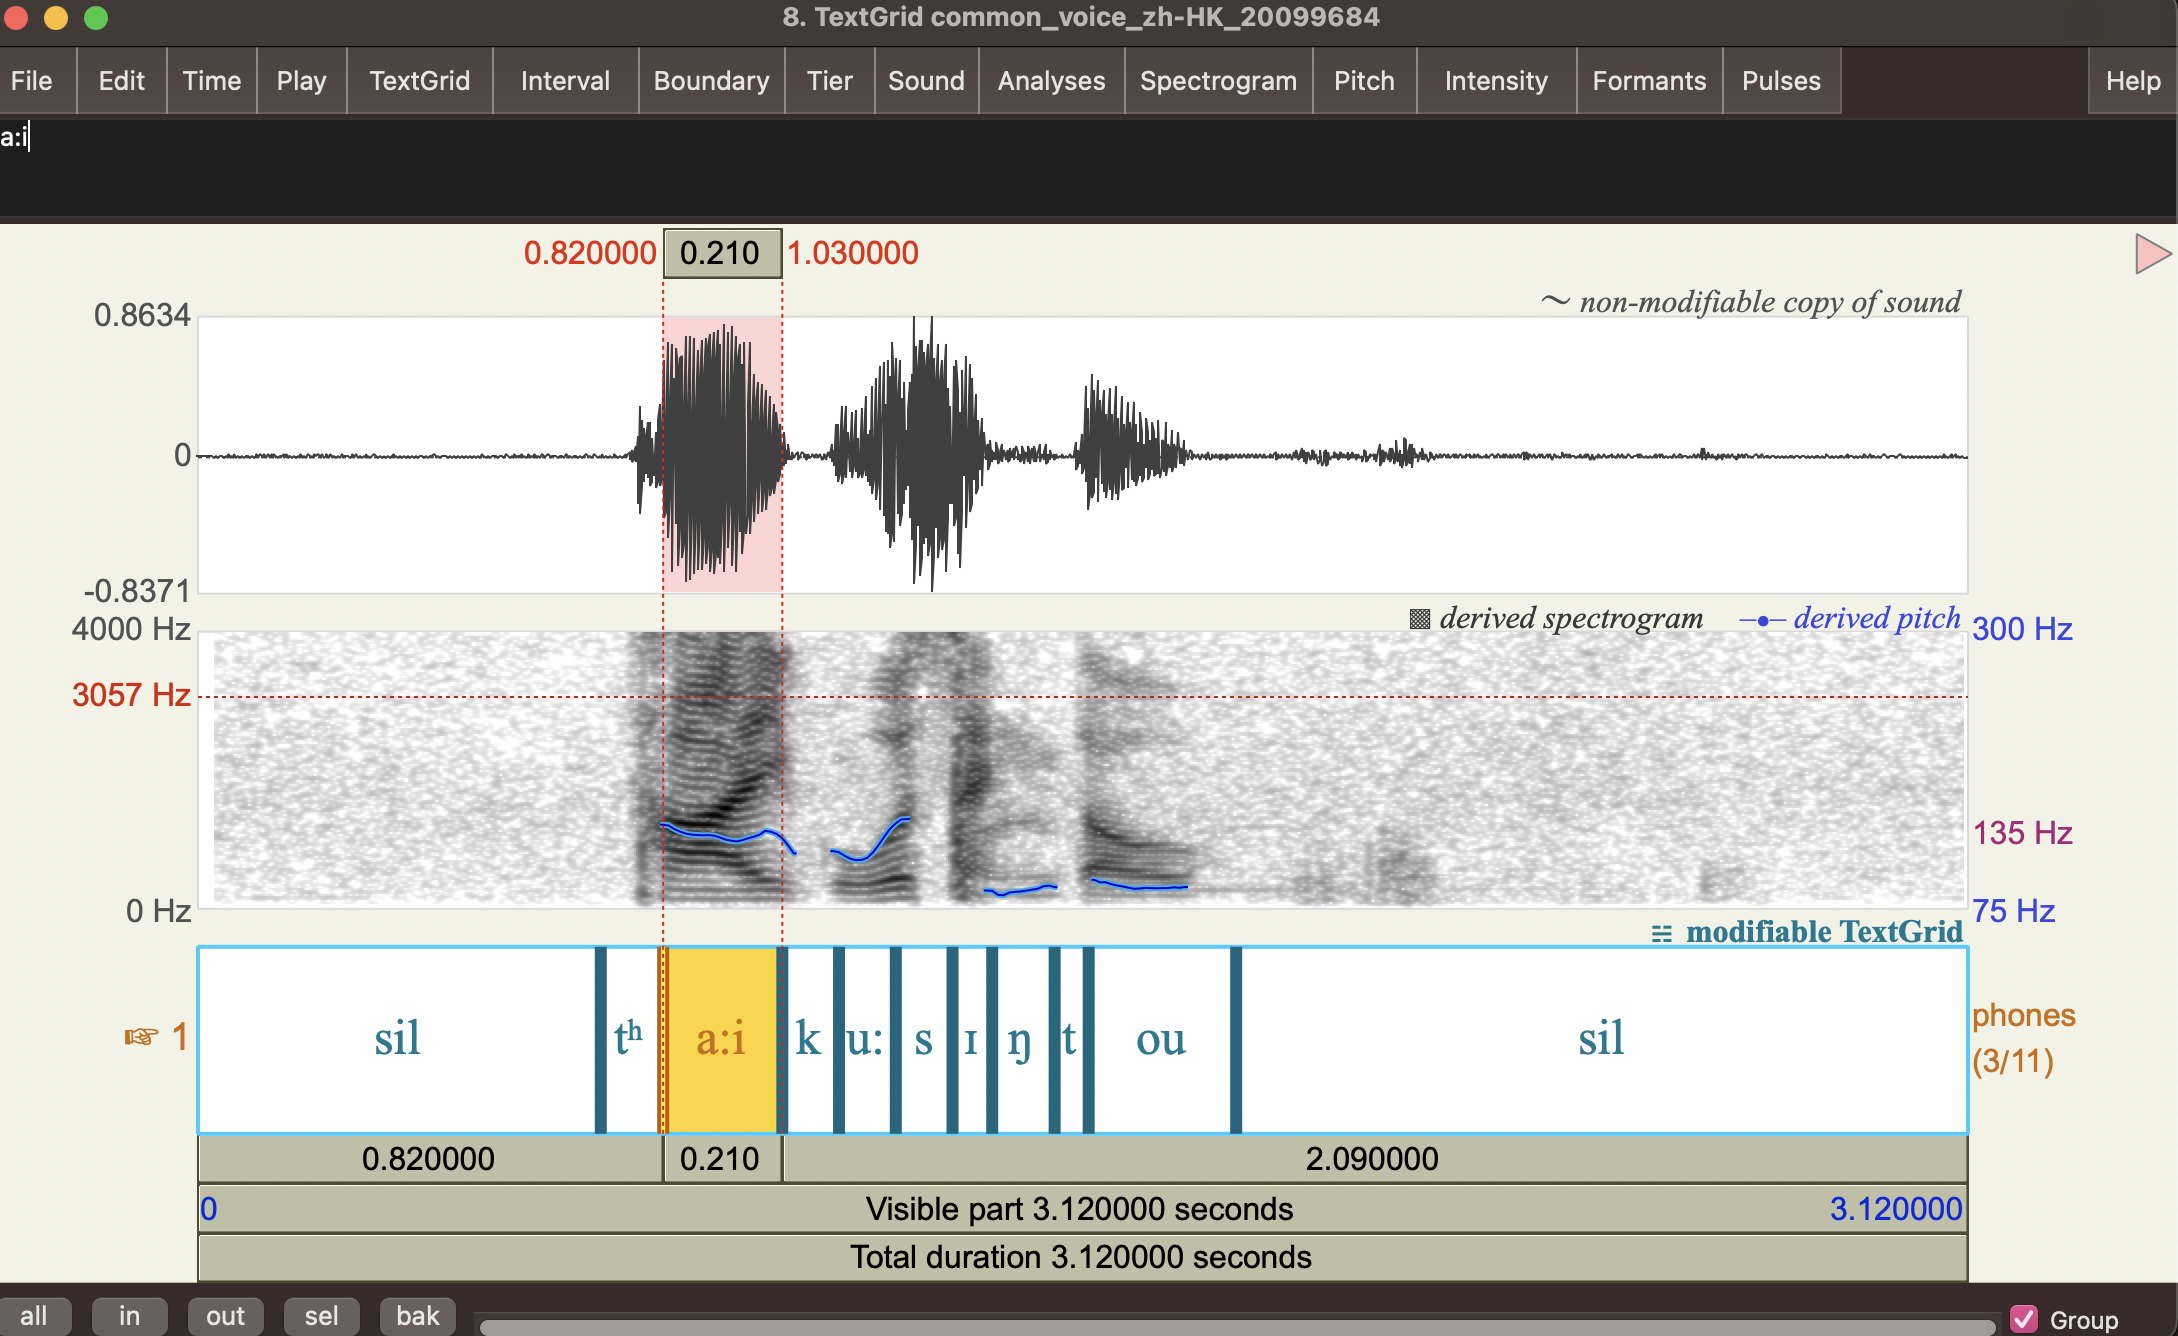
common_voice_zh-HK_20099684.wav
Congratulations 🎉 if you successfully reach here. This is not an easy journey, but you should now have a very good understanding on how Kaldi works. In the next chapter, I will demonstrate a much more straightforward MFA implementation.
Credit
I would like to thank Jian Zhu for his G2P help and Yajie Gu for scripting suggestions.